Hotjar enables you to monitor user behavior on your website through heatmaps, mouse tracking, and click analytics.
Recording this data requires full compliance with privacy and cookie regulations.
Here’s how to install Hotjar in a GDPR-compliant way using My Agile Privacy.
Solution 1 – Automatic Scan
Use the advanced "Cookie Shield" feature to automatically detect Hotjar.
Set the Shield to "Learning" mode, browse your site’s pages as a regular user, and the configuration will be handled automatically.
If you prefer, you can also use manual configuration.
Solution 2 – Manual Configuration
Part 1 – The Hotjar Code
First, locate the Hotjar installation code in your Hotjar account.
It will look similar to this:

Part 2 – Adding the Hotjar Cookie in My Agile Privacy
In your WordPress admin panel, go to My Agile Privacy → Cookie List from the left menu. You’ll see a list of cookies imported during plugin installation, all in draft status.
You should only publish cookies relevant to your website.

On this screen, you’ll see columns such as:
- Cookie Name: the name of the cookie.
- Is Necessary: indicates if the cookie is essential to website operation. If rejecting the cookie makes the site unusable, it is marked as essential (this is pre-filled in the details).
- Auto Update: shows whether the cookie reference text is kept updated automatically. If set to "yes," texts are managed according to GDPR updates.
- Tails: displays a preview of code associated with each cookie. This is particularly useful when adding integrations like Hotjar.
To install Hotjar, search the list for "Hotjar Heat Maps & Recordings (Hotjar Ltd.)" and click on it.
The detail page presents a pre-filled informational text and two blank fields for entering code.
This text appears in your cookie policy and, with "Allow Automatic Update" enabled, stays up-to-date and compliant automatically.
Below this, choose the "Type of Installation" (Javascript and Noscript, or Raw).
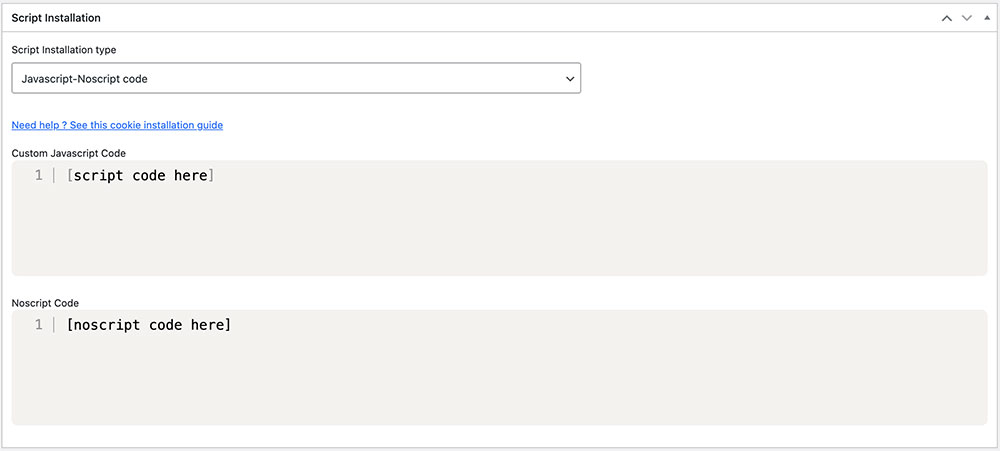
Keep "Javascript-noscript code" selected, and two input fields will appear:
- Javascript Activation Code – where you enter the main code for Hotjar
- NoScript code – for optional NoScript code

Part 3 – Entering the Hotjar Code
Copy the Hotjar code you obtained earlier and paste it into the appropriate fields, as shown in the image above.
Be sure to remove the opening and closing <script> and </script> tags before entering the code.
Remember to save and publish the cookie by clicking the blue "Publish" button in the upper right corner.
Final Step – Verifying Operation
To verify that Hotjar is installed correctly, use Hotjar’s own tools or contact support for help if needed.
When you visit any page on your website, you’ll see that Hotjar remains inactive until explicit consent to install the cookie is provided.
Users can give consent either by clicking "I agree" on the cookie banner or by enabling the relevant cookie under "Customize".


